
JIM LUTON CUSTOM WOODWORKING AND DESIGN
|
|
|
click on image for larger view 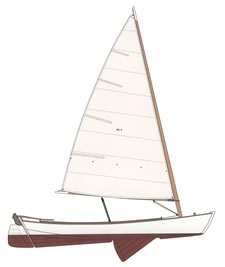


|
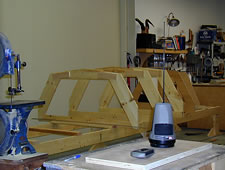
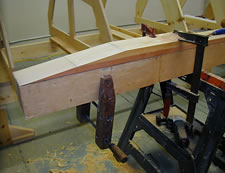
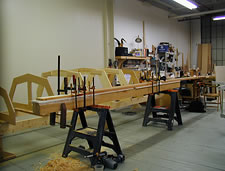
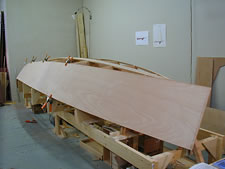
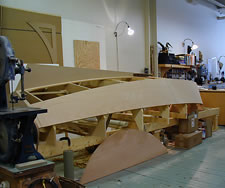
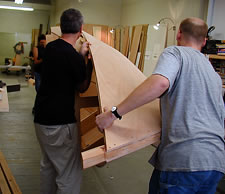
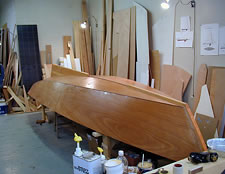
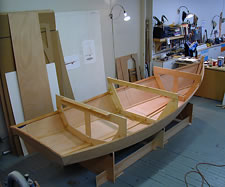
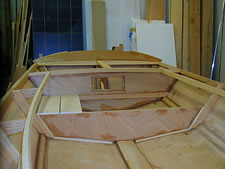
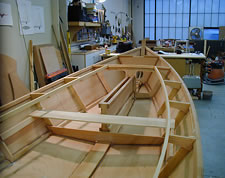
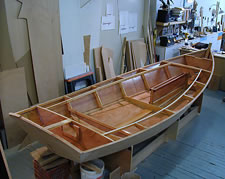
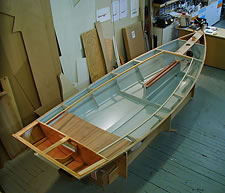
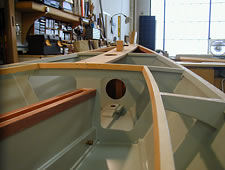
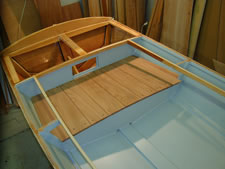
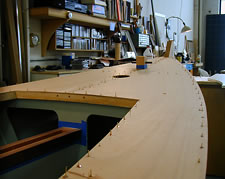
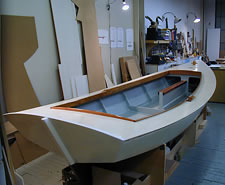
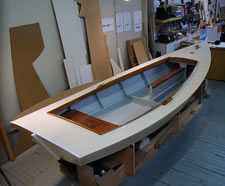
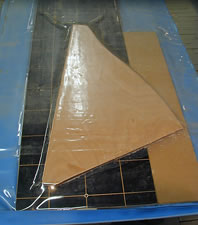
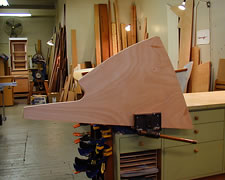
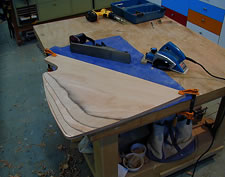
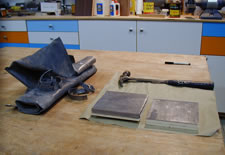
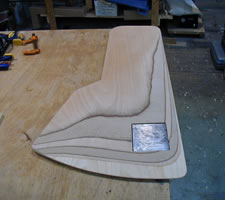
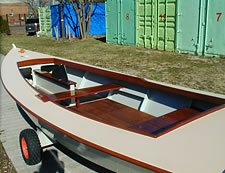
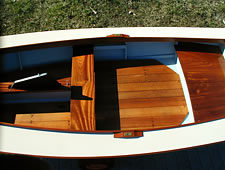
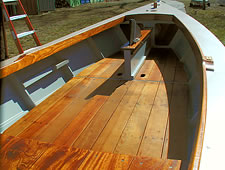
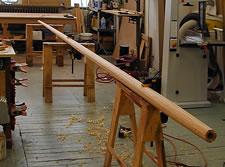
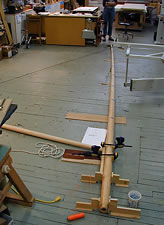
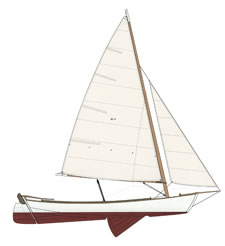
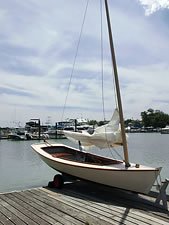
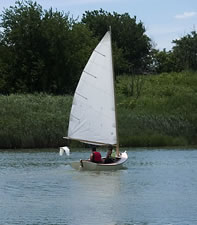
Recent Project: The Windward Sharpie "Cricket" This is my most recent boat. I built a stretched out Windward 15 from Karl Stambaugh's Chesapeake Marine Design here in my Brooklyn Navy Yard shop. Karl's Windward designs are derived from the crabbing skiffs and seaside bateaus once found on Virginia and Maryland's eastern shore. I added 2" to the station spacing, which brought the length to 16' 2" on deck, about the most boat that I could fit into my freight elevator! The body sections were unaltered. I enlarged the sail area to 85 square feet, added battens, and built a boom with fixed gooseneck. I built Cricket on molds, over which I set up the permanent longitudinal members. This method is much like that described in Reuel Parker's "The Sharpie Book". She is planked with 3/8" BS1088 occume ply, from Roberts Plywood, and she's sheathed with 9 oz. biaxial glass fabric. If I did this again, I would definitely try the xynole polyester from Defender Marine that Reuel recommends. The biax required a lot of micro-balloon filler to hide the weave, adding unnecessary weight to the hull. The molds were set up with the aid of a laser. The keelson was scarfed up from two pieces of clear fir. Gluing the keelson scarf. Marking out the pre-scarfed side planks. I made a pattern for the skeg before installing the bottom planks. Flipping the boat over required help from a couple of the neighboring shops. After flipping the boat upright, I put in the frames and bulkheads. There are 2 watertight bulkheads, one forward and one aft. I plan to install additional bag type floatation as well. The deck beams and carlins went in, and the interior was painted prior to installing the deck. I also installed a mooring bitt, which steps on the keelson and notches over the stem knee. After decking, the coamings and seats went in. There is stowage under the stern sheets, accessible from the removable center section. The skeg and gripe are installed now, and the boat is ready for the biaxial glass sheathing. I left three of the molds in for the turn-over, to preserve the hull shape. Frames, bulkheads, deckbeams, and carlins are in, and I've done most of the filleting. Here I'm making patterns for the stern sheet planks. View forward. The centerboard trunk is in. The interior is all done and epoxy coated before finish painting begins. Aerial view showing the painted interior, foredeck king plank/mast partner, and sapele stern sheets. View forward. The watertight bulkhead is visible, and ready for installation of the hatch. Close up of the stern sheets and aft watertight bulkhead. Here I fitted a painted ply hatch, to be held in place against foam seals with bungee cord from the inside. The deck is on. I used pan head sheet metal screws to hold the deck in place until the glue cured, then pulled the screws and filled the holes with epoxy and tooth picks (I've found that epoxy alone leaves air voids down in the hole; an invitation for moisture ingress). Two views of the nearly finished hull, with deck painted, and coamings installed and varnished. The centerboard is built with ply skins around a solid wood core, like Reuel's but much thinner in section. There is a lead insert in the board which I made from scrap sheet left over from shower pans and given to me by a plumber. I hammered the sheets together into a brick, and epoxied it into the board. No fumes! I must have nailed the weight, because the board drops to its exact required depth, and needs no line to keep it from dropping further. There is a simple uphaul, and retainer pin to keep it up. The rudder is simply 3 pieces of ply laminated together. Both boards were laid up in the vacuum bag before shaping. The rudder and centerboard blanks were laminated in a vacuum bag. The rudder planform is cut out, and shaping has begun. Various power and hand tools were used to shape the foiled rudder and centerboard. I used sheet lead, cut to shape and hammered together for the centerboard ballast. I routed a mortise for the ballast, leaving a skin on the underside of the board, then dropped in the lead and epoxied and glassed it in place. Both rudder and centerboard were sheathed in 6 oz. glass, with biased tapes cut for the leading edges and applied in layers. The centerboard was coated in epoxy/graphite, and left unpainted. Rather than screw the floorboards directly to the bottom framing, I made them up in 3 removable sections, one either side of the centerboard, and one large section aft, much like the removable grates in a dory. This allows access to the whole bottom for cleaning. The floorboards are flat everywhere, and parallel with the waterline. I made the center thwart removable for sleeping aboard under a boom tent. I built both mast and boom hollow, from Douglas Fir, to the birdsmouth pattern. I rigged this boat with a "conventional" boom on a Dwyer gooseneck, and set up the mainsail's luff for track and slides. There are good points and bad points to this setup. I love my mid-boom sheeting, which would not be possible with a traditional sprit boom. I've used this sheeting arrangement on many boats, and find that it works well, and falls right to hand. Also, I keep the sail furled around the boom, with the slab reefing lines always made up. So the rig is quick to set up for sailing. I also use a topping lift, and may add lazyjacks as well. On the down side, this setup requires a vang, and of course is more expensive to rig. There are good things to be said for both arrangements. I may set up the sloop rig this season for excitement. The mast and boom were built from Doug Fir, in birdsmouth fashion. This was a lot of work! When I first put the mast together dry, I found I wasn't happy with the taper, so I reshaped each stave a second time. It took three people about three hours to get the twenty-two foot mast blank in glue and clamped up. We staged the mast and boom on the shop floor, and applied sheet tension to bend the mast. We measured the luff curve at various tensions. The sail was built by Douglas Fowler, and I could not be happier with both the process and the result! I found that we were always on the same wavelength throughout the project. I rigged up the mast and boom on the shop floor with the mainsheet, and measured the mast bend at various sheet tensions. Douglas nailed the luff curve spot on, and the sail sets beautifully. Our very first sail out in Jamaica Bay was in wind to 25 knots! We tied a reef in under the lee of the closest island, and had a comfortable reach back home. I wouldn't recommend this for a first outing, but it all went well. We routinely sail from Jamaica Bay out to Coney Island and Breezy Point, handling the sometimes rough water with ease. A typical daysail for us might be 20 miles. I'm looking forward to some longer trips, and some overnighting aboard for this season. The proposed sloop rig, with two different headsails. I built a launching dolly for the boat, with a trailer winch for retrieval up onto the dock. First launch! Maybe we should have christened her "Egret". At anchor off Ruffle Bar in Jamaica Bay on a perfect summer day. In this photo, the deck hardware is not yet installed. See you on the water! |
Web site and all content Copyright © 2000-2026 Canopy Studios, Inc. jim@canopystudios.com |
|